Showing posts with label DIY. Show all posts

Wednesday, 11 May 2016

2 Must Know Painting Tips

There are many different painting tips out there. Probably too many to list. We're going to share two that we think are most important before you start any painting job. 

1. Know the type of paint before you begin
One of the most important things you can do before starting a DIY painting project is to know what you’re dealing with. You need to find out if the dresser you are about to refinish is oil based paint or latex based paint. It is very important to know if you have oil based paint on the surface you are going to repaint, especially if you are using a latex based product as your top coat, because if you put latex on top of oil, the top coat will come off like butter. 


A quick way to test if your paint is oil based paint or latex based paint is to rub a cotton ball that has been soaked in nail polish remover with acetone in it, or pure acetone, on the surface.
If the paint comes off, it’s latex based paint.
If it doesn’t, it’s oil based paint. 


2. How much paint will you need?

The easiest way to figure out how much paint you will need is to measure the square footage. If you are painting a wall, measure the width and the height of all the surfaces you will be painting. If you are painting a piece of furniture, measure the depth and length of the surfaces. Add them together for the square footage.


Example: 1 bedroom, 4 walls at 10L x 8 H = 320 square feet

1 gallon covers approximately 400 square feet
1 quart covers approximately 100 square feet

For 1 dresser, chances are you’ll only need 1 quart of paint.
For a 10x10 bedroom, you’ll need a gallon.

You can also use this handy tool from Benjamin Moore, the
Paint Calculator Tool 


What other tips do you wish you knew before you started a DIY painting project? 


Friday, 21 November 2014

How to Make Your Own Pine Cone Wreath - Holiday Kids Corner Classes


Every year at Erin Mills Paint & Decor Centre, we host Kids Corner.
Kids Corner is a special event just for kids where we do arts and crafts using Benjamin Moore Paint and house hold items. These simple DIY classes teach kids how to mix paint, how to make different decorations and how to share with other kids.

Last year we made pine cone wreaths and decorated ornaments.  Here is a step-by-step guide on how to make your very own pine cone wreath. Please note, a hot glue gun is best for quick results. It's always recommended to have adult supervision when using a hot glue gun!


Step One:

You can purchase bags of pine cones at your local art store such as Michael's  or Walmart, or if you're like me, you have a huge bin of pine cones lying around your house. If the weather isn't too bad and you can find pine cones on the ground, make sure they are dry and free of dirt and creepy crawlies before you start.


Step Two:

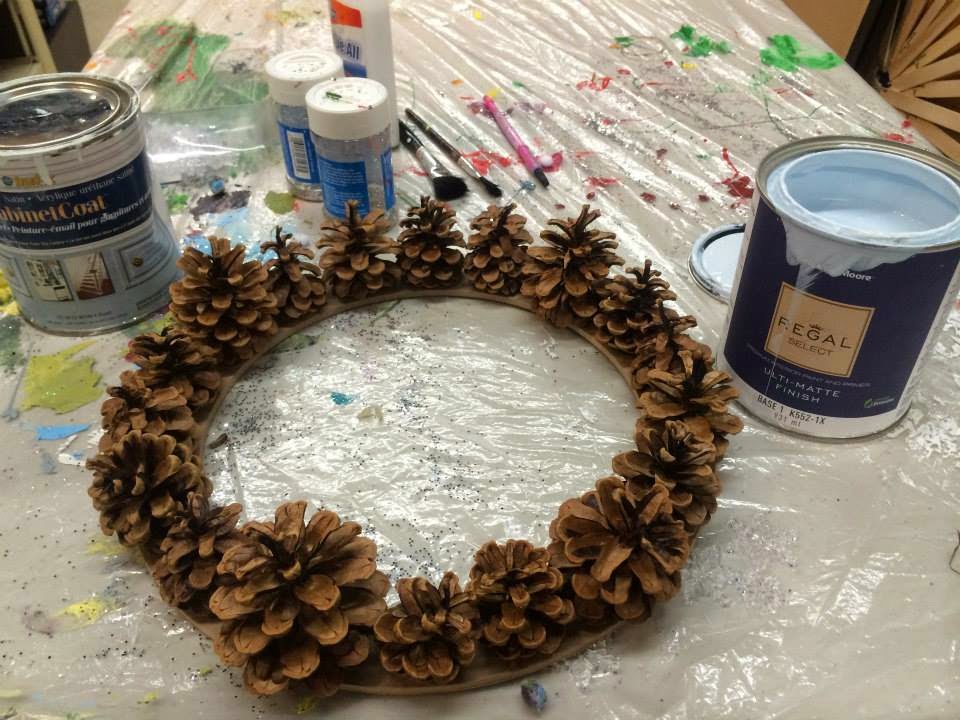
You can make your wreath base using cardboard, foam core or thick cardstock. We opted to purchase wreath bases from, you guessed it, Micheal's Craft store. You can paint your wreath base at this stage to get a uniform finished look, or you can just dive right into glueing, like we did below.


Step 3: 

A hot glue gun is the fastest way to get your pine cones stuck to the wreath base, BUT if you don't have a hot glue gun handy, you can use white glue too. If you use white glue, make sure you put a decent amount on the bottom of the pine cone. Let it dry over night to make sure none of your precious cones come off.


Step 4:  The Fun Part

Take your left over interior latex based paints or purchase tester pots (shown below) for only $1/each from Erin Mills Paint,  and go to town painting your wreath! Use foam brushes, regular paint brushes or artist brushes. An even more inexpensive method of painting is using q-tips or your fingers.
(It's more fun to use your hands ^_^ )

You want to make sure your paint is dry before you move onto decorating your wreath. We used our hair dryer to dry all of the cones. Leaving the wreath out overnight will work well too, just not as fast.


 Step 5: Decorate!

You can decorate your wreath with bows, glitter, ribbon - you name it!  Again, the hot glue gun is the fastest way to do this, but white glue works just as well.  We glued old Christmas Decorations, broken ornaments and other holiday knick nacks onto our wreaths.

To get glitter on your pine cones, mix a little bit of water with white glue to make a glue wash. Paint the glue on any surface you want glitter, then sprinkle glitter over top. Tap your wreath to get extra glitter off and voila. Shiny!


Show off your work , and don't forget to sign the back with your name and the date!


 To be notified of any upcoming Kids Corner Classes, register your e-mail address with us here
 Or check us out on Facebook for notifications and information on our upcoming events.