Thursday, 30 November 2017

Interior Surface Repaint Tips 

Interior surfaces are quite often re-coated with “same on same”, i.e. where the new coating system specified is a replacement of the same type of coating.

The type and the condition of the coating that currently exists on the surface to be repainted is determined by the specifier or painting contractor.

Where a change in the type of coating system is desired or required, special attention must be made to assure that the new system is not only appropriate for the use, but also is compatible.

Where a new coating is applied over a chemically different coating, various problems can arise. Many of these problems can be attributed to one of two incompatibilities;

Binders 
  • Problem - the binders used in the two coatings are not compatible, which can lead to poor adhesion in the dry film. 
  • Solution - a “tie coat", that is compatible with both the old and new coating is recommended
Solvents
  • Problem - the previous coating is incompatible to the solvents in the second coating, which can cause lifting, bleeding, etc.
  • Solution- a “barrier coat", which is compatible with both coatings, does not contain solvent to affect the original coating and is resistant to the solvents in the new coating, is used. 
Gloss considerations
Repainting must take into consideration the gloss as well as the age of the previous coating. A “same on same” application where the previous coating is glossy, must be prepared properly or a failure can result. A glossy surface does not allow penetration of the new coating, affecting adhesion and subsequently leading to peeling, flaking and cracking. Most coatings that cure by chemical reaction can continue to harden and become difficult for another coating to adhere to (even if the new coating is a similar and compatible product).

Re-coat Window
It is important to consider the minimum and maximum re-coat time (i.e. the re-coat window) for any coating system. With some coatings, this can be as short as one to two weeks, or as long as six months to a year. During the window, normal preparation can be used. After the window, even extraordinary preparation may not be enough and a tie coat may be necessary.

Surface preparation.
In both of these cases (i.e. glossy surface or outside 'the re-coat window'), surface preparation is critical. Abrading the surface creates an “anchor” pattern. This increases surface area and provides mechanical adhesion to the surface.

 Colour Change
As a general rule with a colour change, budget grade paint systems may not provide adequate hiding. Premium grade paint systems should be specified. Also, with semi-transparent stain, it is virtually impossible to change to a lighter colour without removing the entire previous system.

Two actions, which should be considered part of the normal procedure in ensuring a surface is suitable for repainting, are the appropriate testing of the surface to be repainted and the application of a test patch.

Comparisons of products 
  • High-Performance Architectural Latex offers substantially better performance than Conventional Latex products in the areas of washability, burnish resistance, and ease of cleaning.
  • The mar resistance of High-Performance Architectural Latex is better than W.B. Light Industrial Coating.
  • W.B. Light Industrial Coating provides better chemical resistance than Conventional Latex or High-Performance Architectural Latex, and almost equal performance to Alkyd in some circumstances.
  • Alkyds have less alkali resistance than Latex.
  • Epoxy and Polyurethane coatings provide the highest level of chemical and abrasion resistance. They are much superior to both Latex and Alkyd coatings.

Wednesday, 13 September 2017

Preparing Bare Wood for Painting

Preparing Bare Wood for Painting


There are hundreds of species of wood used to build a vast array of articles and structures for both exterior and interior exposures. Wood is also unique because it is the one substrate that can have an opaque pigmented finish; stained pigmented finish; or a clear finish.

Surface Preparation, General
Regardless of whether a pigmented, stained or clear finish is specified, the following are recommended practices for proper wood surface preparation.


White walls
Wood can be clear coated to highlight it's natural finish.


 Determine substrate
Before you carry out any cleaning it is best to determine what type of coating has been previously applied to the surface or substrate (if any)

Low gloss coatings -  are less durable than higher gloss coatings making them more susceptible to damage from harsh abrasion and chemical cleaning.

High gloss coatings - are more durable, so will endure more abrasion and chemical cleaning, but are less often used on interior walls because they tend to enhance any surface defects, making them more visible.

 Measure for moisture. Moisture readings should be taken, Exterior surfaces can not have more than 15% moisture present prior to painting; interior surfaces, 12%.

Remove surface contaminants. All grease, oil, dirt, dust, or other foreign matter must be removed from the surface. Avoid using steel wool to clean the surface: small fragments of steel wool can get caught in the grain and cause black spots to form long after the wood has been finished and installed. Rough surfaced woods can be cleaned of most loose material with a wire brush. A stiff fibre or hog’s bristle brush is recommended for smooth finished woods to reduce scratching.

Remove sap and pitch. Especially on softwoods such as pine and fir, all sap and pitch must be removed. All pitch pockets and sap-effected areas must be sealed with an appropriate sealer. If a stain or varnish/stain system is to be applied, the spot sealer must be applied after the stain and allowed to fully dry, otherwise, the colour may appear blotchy and inconsistent.

Deal with knots: If a paint system is specified, all tight knots should be sealed with an appropriate knot sealer. If a semi-transparent stain system is specified, knots should be left unsealed or the colour of the finish may appear patchy.Loose knots should be removed and filled with an appropriate caulking compound.

 Fill the holes: Holes, cracks, and joints are to be filled with an appropriate filling compound level with the surrounding surfaces. Openings in excess of 1/8"inch (3.18mm) should not be the responsibility of the painting contractor.

Sand with 150 grit sandpaper: For finished lumber, sand out any raised grain with 150 grit sandpaper before and between coats to maintain a uniform appearance. All sanding must be done in the direction of the grain, particularly when a stain or varnish system is specified. Sanding across the grain creates scratches that will absorb stain or varnish unevenly, a flaw that will need to be corrected prior to coating application; we’ll discuss this in more detail below. Dust particles from sanding should be removed by wiping the sanded surface with a tack rag, a loosely woven cloth dipped into a varnish oil and wrung out to make it tacky or sticky.


Wednesday, 11 May 2016

2 Must Know Painting Tips

There are many different painting tips out there. Probably too many to list. We're going to share two that we think are most important before you start any painting job. 

1. Know the type of paint before you begin
One of the most important things you can do before starting a DIY painting project is to know what you’re dealing with. You need to find out if the dresser you are about to refinish is oil based paint or latex based paint. It is very important to know if you have oil based paint on the surface you are going to repaint, especially if you are using a latex based product as your top coat, because if you put latex on top of oil, the top coat will come off like butter. 


A quick way to test if your paint is oil based paint or latex based paint is to rub a cotton ball that has been soaked in nail polish remover with acetone in it, or pure acetone, on the surface.
If the paint comes off, it’s latex based paint.
If it doesn’t, it’s oil based paint. 


2. How much paint will you need?

The easiest way to figure out how much paint you will need is to measure the square footage. If you are painting a wall, measure the width and the height of all the surfaces you will be painting. If you are painting a piece of furniture, measure the depth and length of the surfaces. Add them together for the square footage.


Example: 1 bedroom, 4 walls at 10L x 8 H = 320 square feet

1 gallon covers approximately 400 square feet
1 quart covers approximately 100 square feet

For 1 dresser, chances are you’ll only need 1 quart of paint.
For a 10x10 bedroom, you’ll need a gallon.

You can also use this handy tool from Benjamin Moore, the
Paint Calculator Tool 


What other tips do you wish you knew before you started a DIY painting project? 


Friday, 21 November 2014

How to Make Your Own Pine Cone Wreath - Holiday Kids Corner Classes


Every year at Erin Mills Paint & Decor Centre, we host Kids Corner.
Kids Corner is a special event just for kids where we do arts and crafts using Benjamin Moore Paint and house hold items. These simple DIY classes teach kids how to mix paint, how to make different decorations and how to share with other kids.

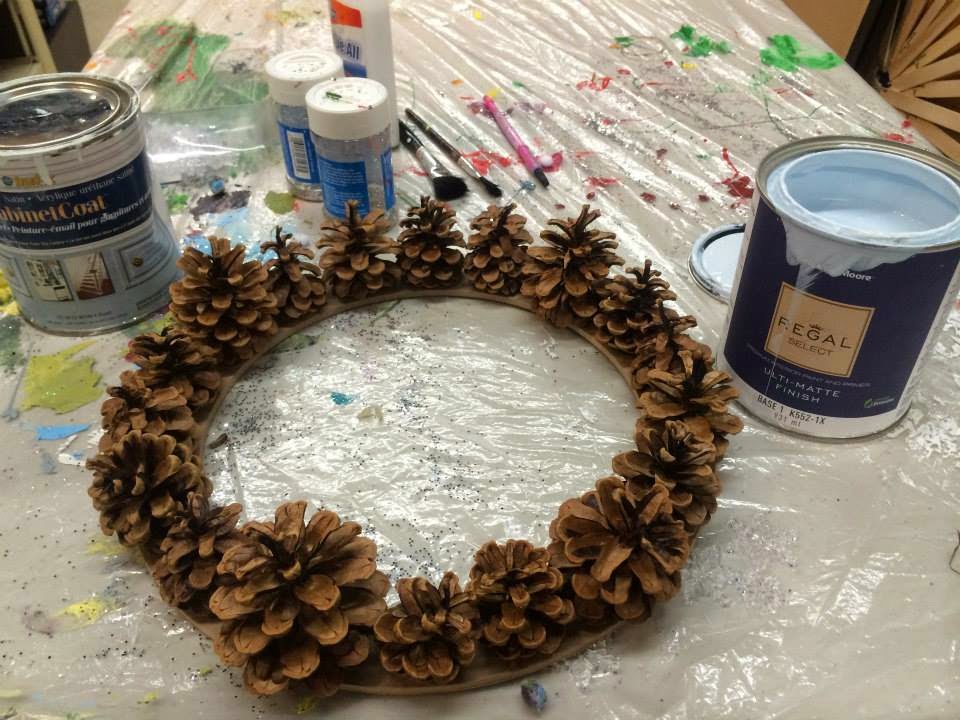
Last year we made pine cone wreaths and decorated ornaments.  Here is a step-by-step guide on how to make your very own pine cone wreath. Please note, a hot glue gun is best for quick results. It's always recommended to have adult supervision when using a hot glue gun!


Step One:

You can purchase bags of pine cones at your local art store such as Michael's  or Walmart, or if you're like me, you have a huge bin of pine cones lying around your house. If the weather isn't too bad and you can find pine cones on the ground, make sure they are dry and free of dirt and creepy crawlies before you start.


Step Two:

You can make your wreath base using cardboard, foam core or thick cardstock. We opted to purchase wreath bases from, you guessed it, Micheal's Craft store. You can paint your wreath base at this stage to get a uniform finished look, or you can just dive right into glueing, like we did below.


Step 3: 

A hot glue gun is the fastest way to get your pine cones stuck to the wreath base, BUT if you don't have a hot glue gun handy, you can use white glue too. If you use white glue, make sure you put a decent amount on the bottom of the pine cone. Let it dry over night to make sure none of your precious cones come off.


Step 4:  The Fun Part

Take your left over interior latex based paints or purchase tester pots (shown below) for only $1/each from Erin Mills Paint,  and go to town painting your wreath! Use foam brushes, regular paint brushes or artist brushes. An even more inexpensive method of painting is using q-tips or your fingers.
(It's more fun to use your hands ^_^ )

You want to make sure your paint is dry before you move onto decorating your wreath. We used our hair dryer to dry all of the cones. Leaving the wreath out overnight will work well too, just not as fast.


 Step 5: Decorate!

You can decorate your wreath with bows, glitter, ribbon - you name it!  Again, the hot glue gun is the fastest way to do this, but white glue works just as well.  We glued old Christmas Decorations, broken ornaments and other holiday knick nacks onto our wreaths.

To get glitter on your pine cones, mix a little bit of water with white glue to make a glue wash. Paint the glue on any surface you want glitter, then sprinkle glitter over top. Tap your wreath to get extra glitter off and voila. Shiny!


Show off your work , and don't forget to sign the back with your name and the date!


 To be notified of any upcoming Kids Corner Classes, register your e-mail address with us here
 Or check us out on Facebook for notifications and information on our upcoming events.

Friday, 13 June 2014

Things You Didn't Know About Staining

How many of you have said  "Hey, I'm going to stain my deck today" - went out, purchased stain and then applied it, without any deck prep consideration? I must admit, before I was stain trained by Benjamin Moore, I'm guilty of doing this. My thought process at the time was "It's wood. It's meant to be stained. I don't need to do any prep work." Right?

WRONG.

In order to get the longest lasting protection for your deck and the most longevity of your stain, there are a few steps that need to be done prior to staining.

1.CLEAN YOUR DECK

Ensure that the surface of your deck is free of dirt, mold, mildew, flaking stain and other contaminants. This is a MUST for any deck - whether it be previously stained, freshly built (we'll talk about new wood a little later) or weathered , old wood.

Depending on the stain you would like to apply and what stage your deck is at, there are different prep products you can use to clean your deck.

For general maintenance, mold, mildew, and dirt removal, you can use Benjamin Moore's Clean.This concentrated formula is wonderful for cleaning many surfaces - even concrete, patio furniture, siding and even pools! (Always be sure to read the label and follow directions prior to starting)

Benjamin Moore CLEAN (318)

  • Ideal for maintenance cleaning
  • Removes mold and mildew
  • Concentrated formula
Moldy, Mold, Mold
My deck falls into the category of weathered wood that was never stained. Three years of dead leaves and moisture build up created the perfect breeding ground for and mildew. YUCK.
I used Benjamin Moore's Clean to remove all of the unsightly goop, dirt and loose fibers.

BEFORE - This is my deck in all of it's moldy glory.
BEFORE - Clean must be applied to a wet surface. I sprayed the entire deck with my garden hose before using the diluted clean solution.

AFTER - Using a garden sprayer, I mixed Benjamin Moore's Clean with water (as per the directions on the bottle) and evenly covered the surface of the deck. I waited 5-10 minutes and then used a stiff brush (found at Erin Mills Paint) on the end of a broom handle to scrub the deck. I rinsed with hose water and voila! Gorgeous.
AFTER - Another shot of my clean deck. That ear you see?
That's my dog inspecting my work.


Peeling & Flaking Finishes
For decks that have peeling and flaking paint or stain, you can use Benjamin Moore's Remove, followed by Brighten, to remove any existing finish on the wood. This is recommended for people who want to use a translucent, transparent or semi-transparent stain, but currently have stained wood. (If you put a transparent stain over top of an existing stain, you won't have an even colour throughout -even if it's the same colour. )

Benjamin Moore REMOVE (315)

  • Removes both latex and oil stains
  • Fast-acting formula
  • Removes clear finishes through solid colour stains
  • Concentrated formula 
  • Must be applied to a DRY surface

Once you've used remove to get rid of any existing stain,
you use Benjamin Moore's Brighten to neutralize the effects of remove and brighten the wood colouring, resulting in an evenly coloured deck.

Benjamin Moore BRIGHTEN (317)

  • Removes tannin and rust stains
  • Breaks the "mill glaze" on new wood
  • Counteracts the darkening effect caused by the RESTORE (316) and REMOVE (315) products on tannin-bearing woods
  • Concentrated formula
  • Must be applied to a WET surface
New Wood
If you have brand spanking new wood that you just installed, you must remove MILL GLAZE prior to staining. . "mill glaze" is found on new, smooth planed wood, and Interferes with the adhesion and penetration of stain. Read more here.)  Using Brighten is the easiest way to remove mill glaze.
Left: Grayed, aged wood. Right: After using Restore & Brighten
Grayed and Weathered
If you've cleaned your deck, but find that it's grayed or looking "dull", don't panic! The grayed wood is a thin layer of dead wood fibers that can be easily removed.  You can use Benjamin Moore's Restore followed by Brighten, to restore (get it?) your deck back to its original glory!

2. DRY then SAND
Yep. Sanding. I can practically hear you groan.

Sanding is an ABSOLUTE MUST when staining or painting your deck. Even if you have skipped the clean step. When most people hear the word "sanding" they instantly think of getting down and dirty, on their knees, scrubbing until the deck is gleaming and shiny - void of any existing finish or texture. DO. NOT. DO. THIS.

Once your deck is completely dry, inside and out (this takes a few days of baking in the sun to achieve the ideal under 15% moisture content of the wood) you need to sand with an 80 grit sandpaper. The easiest way to do this is to get a pole sander and simply have at your deck as though you're curling, or sweeping in one direction. You don't want to over sand, or use too fine of a sandpaper because it will prevent the wood from soaking up your lovely stain. In some cases, it can even re-create mill glaze.

Sanding after any prep work, power washing ( read why you should never pressure wash your deck here,) or daily living will remove dead wood fibers and ready the wood to soak up your stain. Sanding will prevent stain failure and will ensure your stain gets a good grip on your wood. 

After sanding, use a tack cloth or lightly damp cloth to remove the dust.


3. STAIN

Ok. So you've cleaned your wood and then let it dry. You've sanded and removed the dust.
*trumpets blaring* It's time to stain!


Solid
Semi Solid
Translucent
(Available in Oil & Latex)


It's recommended to apply Arborcoat using a natural bristle brush. You can use a roller if you desire, but back brush after.

Stop by our store to ask us about the different finishes, colours and types of stain available for your project. Whatever your project is, we are specially trained to help.

-Margo

Questions?
Comments?
Feel free to e-mail us or comment below.


Erin Mills Paint & Decor - Benjamin Moore
5636 Glen Erin Drive
Mississauga, ON L5M 6B1
905-858-1708